Posts

Screwdriver

Image
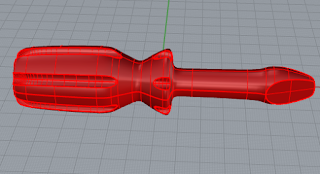
Designing a Screwdriver Designing the Screwdriver: This assignment I remember wasn't too difficult and I got mine to look pretty much identical to the tutorial photo. With the screwdriver, you learn how to utilize dimensions and use the revolve command. After making your dimensions, you essentially just trace one side of the screwdriver, and then you simply revolve it around to create an actual screwdriver. I liked the part when you get to add all of the intricate details that make it actually realistic looking. From there, we need to make the blade of the screwdriver. I then made the cut for the flat side of the blade, and then mirrored it to the other side. We then made the grooves in the side of the handle using the commands pipe and boolean difference. Boolean difference confused me for the longest time, but I started to understand that you have to select the object you want to difference from the other object. After I added in the boolean difference, you basically are d

Castle

Image
Building a Castle Designing the Castle:   This was our very first homework assignment. Our professor instructed us to build a castle using Rhino. Since this was my first attempt on trying to make something, I was pretty bad at it to be honest with you. I went for a very "boxy" design, pretty much only using cubes and cylinders. I tried making a roof that looked like it was a cut-out design by leaving gaps in the roof. I made a "doorway" with the cylinders just stacking them on top of each other. If I could go back right now and create a Castle, you would really be able to see my improvement with utilizing the software.  What Could I Have Done Better? I think for a first time user with the software I did pretty mediocre. There were some students in the class who immediately knew what they were doing, while others struggled like me. Some people had previous knowledge with different softwares, and the rest of the class had only been familiar with painting and

Rubber Duck

Image
Designing a Rubber Duck Designing the Rubber Duck: By this point in the class I was getting pretty familiar with the software. Still not feeling 100% about my skills in Rhino, but I knew that I could follow a tutorial. In this assignment I felt like I was kind of getting the hang of it. To start designing the duck, I made two spheres. One for the body, and one for the head. After that, we had to "rebuild" the duck. This was my first time using this command so I was confused on what exactly it did. Using the rebuild command helps it become "deformable" and allows more control over smaller parts of the surface. Rebuilding it also adds control points and from there, you can essentially use the "Gumball" command to move around areas of the duck. I flattened the bottom of the body to make it appear as if the duck is sitting down. After this step, we reshaped the chest and tail area. You essentially do the same steps for the head, molding it into a duck s

Toy Hammer

Image
Designing a Toy Hammer Designing the Toy Hammer: I had a really hard time designing the hammer. I couldn't get the edges to join properly and did not hide my extra lines at all. I received a C on this project and probably because I didn't spend enough time on it. this model contained a lot of attention to details. For this project we had to make a lot of layers, so I did that. I had to make sure all the dimensions were correct, so that took a little bit. We first had to create the claw. I used the circle and curve commands to make the claw. Then you extrude this. Then you created the head and revolve it. To add the head to the claw, you use boolean difference. Then we created the slit in the claw. Next I worked on the tang and handle, and then came the hole for the handle. By now I was getting used to the boolean difference command. We didn't have to render this assignment so I didn't.  What Could I Have Done Better? I definitely could have worked harder and t

Vinyl Tattoo Project

Image
Designing my Vinyl Tattoo Designing the Tattoo: For our first project, I wanted to make sure it was unique, so I went on Pinterest and looked up illustrative and geometric tattoo designs. I found a bunch of designs I liked, mostly pertaining to aliens and skeletons, so I thought to combine the two. I found a design pretty similar to what I wanted, and got to tracing the design. I had some difficulties with this at first, due to the fact that all of my lines were just single lines and didn't join in any way. When I had our professor look over my design, he said he really liked the design but that I needed to go back and join all of the lines. I guess in my head I didn't realize that all of the lines had to be joined, because it was going to go through the printer. A couple other classmates had this issue too, so we went back to work fixing our designs. My tattoo design was essentially all made out of lines, so it took me a pretty long time to go back and fix everything. I

3D Head Scan

Image
3D Head Scan How I Did The Head Scan This was one of the first projects we did, along with the homework. Frankie took each student out in the hallway and scanned their heads and upper bodies. This process took a while, because the scans had to be pretty much perfect. I remember I had to redo mine because I thought Frankie was done with the scan, but he wasn't. I had to redo my scan a couple times. I didn't want to have my scan done with my glasses on also.  What Could I Have Done Better? I could have remembered to dress up the day we took the scans instead of forgetting and having to wait to retake it. I also could have sat more still during the scanning process so my instructor didn't have to restart it.  Aspects of the Project I Am Happy With? The project is definitely a unique one and I am happy that I got to even have a scan done of me. I am happy with how it turned out and that I can put myself in Rhino or Sculptris and manipulate parts. I think everyo

Shapeways Ring Project

Image
Designing the Ring Designing my Ring: At this point in the semester I was pretty tired out and ready for Christmas Break, but we had one last big project. To design a ring, and have it ordered and delivered from Shapeways. I had some difficulty figuring out how to make the ring, and how to correctly use Flow with the right dimensions.    I think figuring out the dimensions of the ring was the most difficult for me, I would always get confused when starting a new ring from before. I was getting Artist's "Block," so I went home and looked at my collection of rings. I liked the rings that had gems in the center of them, as well as this one ring I had that was wider in the center of the ring. It had a piped design all around it and gave off a nice texture and shape. I wanted to recreate this in my model, but still make it unique with the different style of piping. I started out with a circle with the correct dimensions, and I made an arc on one side of it and mirrored it